Debris removal
The base of the Trylon tower I am putting up requires 6 yd³ of reinforced concrete. Of course that means digging a hole that will displace the same amount of soil. That's a lot of dirt and rock! Where will you put it? How will it get there? You cannot easily hide that much on a typical suburban lot.
If you don't already have one, borrow or buy a wheelbarrow. Mine has a rated capacity of 6 ft³, which is not quite ¼ of a yd³ (27 ft³). In reality you will not and should not approach the rated capacity; 3 to 4 ft³ is the limit for safety and what the average, healthy person can handle. In other words, about 50 wheelbarrow loads.
The topsoil you will start with has some value. Put it in your garden or offer it to your neighbours. Unfortunately that will rarely amount to more than 2 yd³. Below that you will encounter rock, sand or clay, or some mixture of them. Putting up a sign on your lawn offering "Free Clean Fill" is unlikely to make the problem disappear.
On my rural property I have many available solutions to this problem. The stonier soil has gone to repair the ruts on my 100 meter long driveway. The soil will be used to fill low spots on the lawn. The large stones will go to the stone wall or will be used as paving stones when I get around to doing landscaping around the house.
I am fortunate. Chances are you are not. So think very carefully before you start digging.
Excavation alternatives to consider
Picking up a shovel and having at it is one way to dig a hole. Although it is hard physical labour it comes with a certain sense of accomplishment. One benefit is that you do it on your own time, when and how you want. Buy some refreshments and invite over your strongest ham buddies and you've got a social event!
Digging may seem simple but it comes with risks. If you are in poor physical condition or if you don't know your limitations or you use poor technique you can injury yourself. Mistakes multiply when you're tired. Take frequent breaks and know when to call for assistance if you're in over your head. Don't be stubborn where your health and safety are concerned. There are ample references to consult on tools and tool use so I will not give a tutorial on safe, efficient digging technique.
The second alternative is the same but with hired help. I'll bet that you, like me, know a few teenagers in the neighbourhood who would welcome the opportunity to earn pocket money. This helps them and you, and neighbours may look more kindly on your tower knowing that you've given their or their neighbours' kids an opportunity. However if you're fearful of liability in case of injury you may want to reconsider.
The final alternative is machinery. A small backhoe and a skilled operator can almost surgically dig a hole with straight walls and square corners. Some touching up afterwards with a shovel and you're done. Don't hire a fool or you'll pay the price of an unusable hole and a mess to clean up.
If you are sitting on rock or (worse) bedrock, you have a predicament. Rock can be removed with hand tools, though it's brutally hard work even when you use appropriate tools. You won't find those tools at the typical big box hardware store. I've dug several holes this way when I was much younger. You can rent a pneumatic breaker (sometimes called a jackhammer). Using this tool is harder on the body than you might guess. Take frequent breaks. And remember that the tool breaks the rock but doesn't remove it. You'll still have to shovel.
Backhoes with hydraulic breakers can be expensive and large. A small one is preferable for a typical city lot though they take more time. I've hired both for excavation outside the realm of amateur radio. The big ones are impressive (and loud) machines to watch. They're also very expensive and will assault your family's and you neighbours' eardrums. They won't like it. Be prepared.
One last note about safety: an open pit is an accident waiting to happen. Even if someone's pet, or worse a child, falls into the hole you could be in big trouble. Around here the hole is what the lawyers call an "attractive nuisance." Put a barrier around the hole when you are not working on it, or at least wrap some bright warning tape around the stakes.
Staking the hole and breaking ground
You've found the perfect spot for your tower, as far as possible from noise sources but not too far for your transmission line attenuation, clear of utilities and approval from family and city, and at least tolerance from your neighbours. It's almost time to break ground.
Purchase or make 4 wood stakes, or even scrap metal rods if you happen have them (re-bar works well). Mark the corners of the square excavation, setting back a bit from the corners so that they stay put when you start digging. Getting the stakes in the correct positions is not entirely trivial. Your ground may slope and making a square requires more than simply measuring each side.
Using a carpenter's square to make right angles doesn't work so well on the ground. Error will easily creep in over several feet. Start by pounding in a stake for one corner. Next measure the side of the hole and place the second stake the same way. For appearance sake you may want to choose a side that you can make parallel to a fence, house wall or other property feature. It will give a more professional and pleasing look to non-hams.
Now mark the positions of the final two stakes, but do not pound them in yet. We need to square the hole first. There is a simple technique from the building trade to help us out. In a square or any rectangle the diagonals will only be equal if the corners are all square. Measure them. The exact values don't matter, only that they agree. I've even used a yagi element and my thumb position to quickly and easily check diagonal equality since it's easier to use than a tape measure for this task.
I can almost guarantee that no matter how careful you've been you'll have some error. Move those final two stakes so that the diagonals are equal and all four sides are the required length. Only then should you pound in the stakes.
Get our your long-handled spade and push it into the ground right around the excavation perimeter. When you have the spade lines agree with the staked lines it is time to break up the sod and remove it. This can be harder than it looks since vegetation binds the soil into a solid mat. This is how vegetation prevents erosion and is used to reclaim deserts.
Proper digging technique and tools
Go to any hamfest and you'll notice that too many hams are unfamiliar with physical labour, or have left it behind in their distant youth. Digging is hard work. Big DXCC and contest scores are great motivators but they do not confer physical strength and endurance. Be prepared: use the right tools and techniques to do it safely and at minimal risk to your comfort and health. Otherwise hire the job out.
I will not give a tutorial on digging. There is so much to say and many have said it better than I ever could. Besides, would it really help you if I listed out a couple dozen pointers? That's a lot to keep in mind and learn to apply as you go about the job. Lists are no substitute for experience. Watch, learn and do, in whatever way works best for you, whether it be internet video or other online resources or simply watching someone else go about it.
Dealing with hard clay and rock
Organic-rich topsoil doesn't go down forever. Even out in the rich agricultural land of the Canadian prairie where I first dug tower holes it may only go down perhaps 3' (1 meter). Beyond that we had to deal with dense clay that was more difficult to remove. At my current QTH the topsoil quality is poor, thin (1') and only suitable for hay and pasture. After that is clay, rock and bedrock.
After removing the top 6" I again probed for stone and rock since I could get down that extra depth. What I discovered was worrying. To understand whether this was bedrock I dug a narrow pit that reached down 3' below grade. This went quite fast since the volume of soil being removed was small. Getting a shovel into the narrow hole was not easy and I eventually resorted to a hand spade. When I hit solid rock I stopped and tested what I'd found.

 Most of the tools you're looking at were laid out for the purpose of the picture and do not necessarily should how I did the work. What did matter at this point was the large cold chisel and hand sledge. I got down on my belly, leaned into the hole and tested the rock hardness. It was a mix of shale, rock shards and hard stones. It didn't seem to be bedrock so while I was disappointed I was not entirely discouraged.
The next day I excavated down to that rock layer. Notice that the pile of dirt beside the hole is growing.
 Luckily what I found was not bedrock. The soil at this depth transitioned to the hard stone-infested clay mix I talked about before. The stones became numerous and irritating. Even the small ones rarely succumbed to the shovel, instead requiring chiselling them loose. The bigger ones had to be dug around until the chisel could get underneath and pry them loose.
You cannot leave this rock behind when it's poking out the sides of the hole. Concrete does not bind to rock without chemical assistance, so water will creep over months and years and erode the concrete and re-bar.
In a way the large rocks were a blessing. As the depth increased I had to resort to using the chisel throughout the excavation to first break the soil so that the shovel could get purchase. Rocks simplified the work. That is until you encounter a very large rock.
Monster rocks
There are rocks, and then there are rocks. The one that the probe and pit uncovered was one of those. The size is what made me think that I'd hit bedrock. But it was difficult at first to ascertain its size. Trying to dig around it seemed fruitless for a while. Finally I discovered that it was somewhat flat, with a height less than its width. I breathed a sigh of relief until I realized how heavy it was.
When it did shift from its ancient position I found it too heavy to lift. With effort I could move it but I could not by muscle alone lift it out of the hole. I estimate its weight at 70 to 80 kg. One strong person or two of me could have done it. Since I was on my own and I did not want to wait a day or two for a friend to drive out to help I improvised.

A 6 foot length of 2x10 lumber I had lying around served as a ramp. My decades old hand-operated winch (which I once used to tension guy wires), a small tree and a rope were my helpers. The only problem was that the cable wound on the winch wasn't long enough to pull the rock far enough.
The middle panel showed my first attempt which ended in failure. I tried it this way so that I'd be close to the rock to check it in case it slid sideways and the ramp tilted. But the winch caught on the top edge of the lumber. For my second attempt the winch went above ground and I stopped frequently to check the rock's position.
The rock still could only be lifted a foot shy of the top of the ramp due to that short winch cable. I couldn't push it well enough from below so I pulled on the rope from above using the full strength of my leg muscles strengthened from years of cycling and running. It was enough, barely. I ended up sacrificing the corner shake which happened to be on the path of least resistance.
Although I did have a better winch it was one that was not set up for this style of operation. It's the one that I'll be using to lift heavy tower sections. The point is there is always a way if you have good mechanical sense, a large junk box of mechanical aids and a scrupulous attention to safety.
No shortcuts
Digging is hard work. Even if you hire teenagers with shovels or a backhoe you need to supervise, measure, direct and finally clean up any errors. As the bill climbs higher or you become impatient you may be tempted to tell yourself that it's good enough and rush to the next step. When you do it yourself your inclination to be hasty is increased. Your body and mind conspire to convince you that you've done enough.
Except you have not done enough. Don't be hasty and take shortcuts. Do it right. Here are a few items to watch out for:
- The hole isn't square, either horizontally or vertically. Fix that, even if it means you'll need to order more concrete.
- The hole is undersized at some depths. See the previous point.
- Most foundations specs call for a flare at the bottom. Too many hams try to convince themselves it isn't needed. Hint: it is.
- A large rock is sticking out from the side of the excavation. Remove it. Stone binds poorly to concrete and the boundary is a place where water will slip in to degrade the concrete and erode the re-bar.
- As you go deeper the shovel will seem to bounce off the compacted soil, and what you do dig up has to be lifter higher to get it out of the hole. It only gets harder. You may try to convince yourself you've gone deep enough, or that you can go wider and shallower provided the concrete volume is equal. Don't! That it gets harder is a good sign since it indicates that you've reached soil with greater bearing capacity, and that's makes for a stronger foundation. Follow the spec.
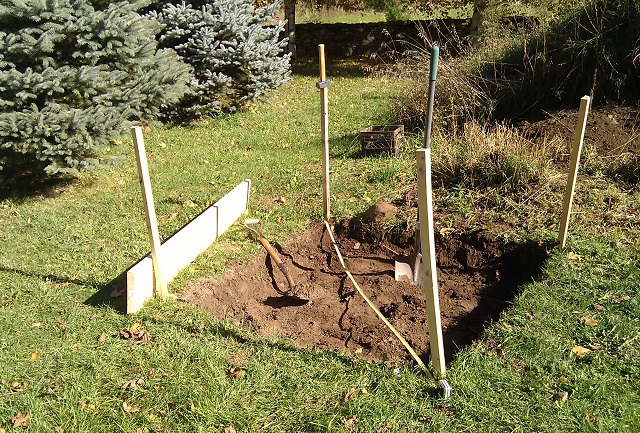
Casing the top of the base
When you're done with the digging you must also build a casing above ground so that the concrete surface is above grade. Do not skip this step. If you leave the base at grade water will easily pool and eat away at the tower galvanizing. Sooner than you realize it will begin to rust. Yes, It happens quite frequently, especially in colder climates where spring thaw can leave the base submerged in an ice/snow/water mix long enough to do real damage after several winter seasons.

The casing should be square, level and secure from movement while the tower is moved in position over the hole and while the concrete is being poured. If the ground is uneven you'll have to use wood or other material to fit the grade and ensure that on all sides the base is raised sufficiently above grade.
You can see my cased hole in the picture. The 2x4 skids on two sides are nailed in a fashion to hold the casing square and will serve as supports when the bottom section and stubs are suspended for pouring of the concrete. This will be described in more detail in a later article. The weights on the near corners are part of that plan.
Since the ground slopes a few inches I used a 2x10 on the near side and 2x6 on the other sides. The gaps are filled with other lengths of lumber. The casing and fillers are held in place with stone and dirt from the excavation. Alternatively stakes can be used to hold the casing in position and square, and larger lumber on the sides could be used at the cost of stripping sod on the high sides to keep it level. I used what was available and helpful for the next stops.
Once you're done...
Try not to leave the hole unfilled for too long. The longer the hole remains the more likely an accident will occur. In my experience I always feel some reluctance to see yards of concrete sliding into the hole into which I put so much effort and time. But there's only so much admiring you can do for what, in the end, is just a hole in the ground.
The only significant casualty of my open hole was an unfortunate field mouse. Perhaps the fall killed it or perhaps it was a combination of injury, exposure and hunger. Tak care that nothing larger becomes a victim of your hole.
We are getting close to the end. The next steps are to build and position the re-bar cage, suspect the base section over the hole and, finally, pour the concrete. That's coming up.
No comments:
Post a Comment
All comments are moderated, and should appear within one day of submission.